Showing posts with label #11m1. Show all posts

Sunday, 14 April 2013

#11m1 #11n3 #11p4 #PromoteIt

Starter

Watch this TV advert - 
  • What is the purpose of this advert?
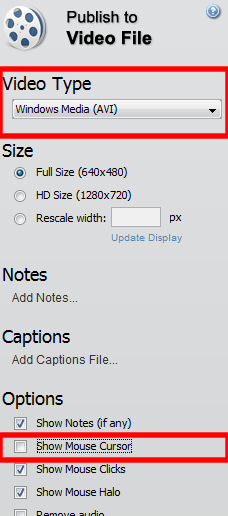
  • What are the key features that make this an effective advert?


Promote It


You must produce a promotional product (promo) for your game that encourages people to play the game.

For 1 mark, a student may have needed guidance, but must have created a simple promo that makes use of some assets from the game. 
For 3 marks, a student must have created a simple promo that makes use of appropriate assets from the game to attract interest and encourage people to play. 
For 5 marks, a student must have created a promo that makes use of well-chosen assets from the game to attract interest and persuade people to play.

Here is an example of a 5 mark promo:


Main Task Part 1

  • Use http://www.screencast-o-matic.com/ to record video clips of your game in action
  • Record at least 1 clip for each level of your game
  • Try to make the clips exciting and show as many different aspects of your game as you can

  • Top Tip 1 - when you have finished a clip click publish to video file
  • Top Tip 2 - choose windows media as the video type
  • Top Tip 3 - turn show mouse cursor off

Main Task Part 2

  • Collect / create any other assets you will need for your advert
    • PEGI Rating Sign
    • Music and / or voice over
    • Console logos
    • Quotes about your game

Main Task Part3

  • Use Windows Moviemaker to create your promotional TV advert.
  • It must include:
    • A PEGI rating
    • Video clips of your game in action
    • Suitable music / voice overs
    • Comments and quotes about your game
    • A release date 
    • What console(s) it will be released on

  • If you need some help with movie make then use the YouTube Playlist below
  • You need to use the next button to scroll through the videos on this playlist.


Plenary

  • Publish your completed advert as a movie - make sure that you save in Sites--> D205SPB --> Game
  • Use Adobe Dreamweaver to link up your movie on the Game page of your website

Thursday, 7 March 2013

#11m1 #11n3 #11p4 Thursday 07/03/13

Starter 

for the 1st 15 minutes of the lesson. do one of:

  1. Filling in your test plan
  2. Filling in your assets table

Main
  • You should spend the rest of the lesson working on your game
  1. I have made a working menu screen in my game
  2. I have made a working instruction screen  in my game
  3. I have made a working win screen in my game
  4. I have made a working lose screen in my game
  5. I have all of my buttons working in my game
  6. I have a working level1 in my game
  7. I have a working level2 in my game
  8. I have a working level3 in my game
  9. I have added music / sound effects in my game
  10. I have created a loading screen for my game
  11. I have created a favicon for my game
  12. I have saved my game as an executable file
  13. I have linked the executable file to the game page of my website 

Plenary

11m1 - Go to the 11m1 Unit5 progress tracker and update your sheet Click here

11n3 - Go to the 11n3 Unit5 progress tracker and update your sheet Click here

11p4 - Go to the 11p4 Unit5 progress tracker and update your sheet Click here


If you are unable to make progress on your game in today's lesson then spend the lesson filling in the review attached to the email i have sent you

Wednesday, 6 February 2013

#11m1 #11n3 Cover Friday 08/02/13

Hello Gentlemen, as you will have no doubt figured out by now, you have cover today. Please spend today's lesson working on your games. We have only a few weeks left to work on our games so every hour counts - don't waste this lesson!!

A parent's evening signup sheet is on my desk - please use it! I want to see as many of you as possible.

Mr Smith

Starter

  • Log on to your school email and find the Unit5 progress tracker spreadsheet I shared with you
  • Click on the sheet with your name at the bottom of the spreadsheet
  • Please update what you have done so far for Unit5.
    • Y = All done
    • P = Part done in progress
    • N = not done at all

Main

  • You should spend today's lesson working on your game in GameMaker
  • Make sure that you update your Assets table if you use any pictures from the internet

  • If you cannot make progress on GameMaker then spend this lesson making sure that all of the work below is linked on the development page of your website
    • Game Overview (PDF)
    • Your annotated photos of your moodboard with feedback comments
    • Completed storyboard templates
    • Rules Log (PDF)
  • If everything is linked up and you still cannot progress with your game then please start filling in the review template. This should already be saved in your area already and is attached to the email I have sent you.

Plenary

  • Update the Formative testing section at the top of your Test Plan with any thing you tested about your game
  • Get 2/3 other pupils to play your game and record their comments in the Feedback section of the test plan


Wednesday, 12 December 2012

#11n #11n3 #11p4 Create Your Screens

1. Create a new folder in your Game folder called Screens

2. Download the attached files from the email I sent you into your Screens folder

3. Open them all in Adobe Fireworks


4. Create your storyboard designs for the menu / title screen, instructions screen, winning screen and losing screen on the computer

Extension Task:

Continue using the gamemaker tutorials (File Store / Read / ICT / Mr Smith) to create a platform or scrolling shooter game

Wednesday, 28 November 2012

#11m1 #11n3 #11p4 Click On The Fruit

LO1 - To understand GameMaker key words
LO2 - To create your first game in GameMaker


1. By the end of this section you should have created your first game - Click on the fruit


2. You should understand what these words mean and be able to create them:

  • Sprite
  • Object
  • Action
  • Event
  • Room
  • Background

3. Extension Task:
  • Can you add more levels to your game?
  • Can you create a title screen for your game?
  • Can you add a win & lose screen for your game?

Monday, 26 November 2012

#11m1 #11n3 #11p4 Link Your Work Up

On the Development page of your eportfolio you need to have linked up:

1. A PDF of your completed game overview

2. A PDF of your annotated moodboard photographs 

3. PDFs of your completed storyboards

  • Menu /Title Screen
  • Instructions Screen
  • Level1
  • Level2
  • Level3
  • A Win Screen
  • A Lose screen
  • Any other screens you have designed

Sunday, 11 November 2012

#11m1 #11n3 #11p4 Year 11 Storyboards 2

LO1 - To understand what progress you have made and what you still need to do
LO2 - To develop a set of storyboards for your game


Starter

  • Log on to your school email
  • Fill in the storyboard progress tracker spreadsheet that i have shared with you- what progress have you made so far

Main

  • Continue to complete the storyboard templates for each screen of your game
  • Get feedback from a partner for each screen
  • Use the feedback to complete the action taken screen

PHOTOS OF PAPER DESIGNS CAN BE FOUND ON: 
FILE STORE / READ / ICT / MR SMITH / 11P4 or 11M1 or 11N3 / STORYBOARD PHOTOS


Plenary

  • Update the progress tracker spreadsheet to include what you have achieved in today's lesson

Sunday, 4 November 2012

Year11 Storyboards 1

You must complete a storyboard template for each screen in your game


  1. Make a new folder in your D205SPB11 / Development folder - call your new folder Storyboards
  2. Download these templates into your new storyboards folder
  3. Complete each of the templates in as much detail as you can
  4. Add a scan or photo of your paper designs into each template


Backstory Screen.doc Download this file


Instructions Screen.doc Download this file


Level1 Screen.doc Download this file


Level2 Screen.doc Download this file


Level3 Screen.doc Download this file


Losing Screen.doc Download this file


Menu Screen.doc Download this file


Winning Screen.doc Download this file


Friday, 26 October 2012

#11m1 Friday 26/10/12


In today's lesson:

Continue with your work from last lesson - creating storyboards for your game

You MUST have a storyboard for :
  • Title Screen
  • Instructions Screen
  • Back Story Screen
  • Level1 
  • Level2
  • Level3
  • A winning screen
  • A losing screen
You COULD have a storyboard for:
  • Options
  • Pick a character screen
  • Tutorial screens

Have a look at this example from last year, to get an idea of the standard required

https://dida.wildern.org/07emily.pullen/D205SPB11/Development.html

Monday, 22 October 2012

#11m1 Monday 22/10/12

Before you can start building your game, you will need to design it.

To do this you will need to storyboard out your game

What screens will you need to have to make an effective game?


Use the storyboard templates to draw out a storyboard for each screen in your game. Remember that the drawings need to be good enough for someone to be able to know what your level will look like


Have a look at this example from last year, to get an idea of the standard required

https://dida.wildern.org/07emily.pullen/D205SPB11/Development.html

Wednesday, 17 October 2012

#11m1 #11n3 Wednesday 17/10/12

Hopefully you are now at the stage of having completed your moodboards or at least have nearly done so

DON'T FORGET - MAKE SURE YOU HAVE PICTURES FOR ALL ITEMS ON THE MOODBOARD CHECKLIST

Once you have done your next job is to get some photographic evidence of your work

You need to take photos of the different parts of your moodboard - insert them into PowerPoint / Word / Publisher and then annotate them to explain the ideas behind the items on the moodboard

You then need to get some feedback comments about each photo and add that to your annotations

Take a look at this example from last year to see what to do

https://dida.wildern.org/07emily.pullen/D205SPB11/Development/Mood%20board/Mood%20Board%20Analyse.pdf

Monday, 8 October 2012

#11m1 Monday 08/10/12

LO1 - To begin to develop a moodboard that meets the SPB requirements


For the full 5 marks a student must have produced a complete and convincing moodboard 
that details: 

    • characteristics of the target audience 
    • genre, style, platform and rating 
    • features of the game 
    • how the game will be tested 
    • detailed and constructive feedback from others. 

The moodboard is supported by sound reasoning


Today's Tasks


  • Cut out the images that you have collected and begin to add them to your moodboard
  • Put images into groups on your moodboard - add headings that match up with your checklist items
  • DO NOT - Do any writing (other than headings) on your moodboard
  • DO NOT - Add any hand drawn images to your moodboard


Plenary


  • Update your moodboard checklist to show your progress
  • What do you need to do next lesson?


Wednesday, 3 October 2012

#11m1 #11n3 Wednesday 03/10/12

LO1 - To understand the requirements for the moodboard
LO2 - To collect all resources that will be needed for your moodboard


Task 1

  • Continue to collect the images that will go on to your moodboard
  • Remember you will need at least 2 or 3 images for each item on your moodboard checklist

Task 2

  • Save the document with the images you have collected in your Development folder
  • Make sure that you have a header with your name in it
  • Email 

Plenary

  • Update the Date collected column of your checklist
  • Have you got everything that you need?
  • How will you get the missing items to me so i can print them before our next lesson (HINT: DO IT AT HOME AND EMAIL ME --> M.SMITH@WILDERN.HANTS.SCH.UK)

Friday, 28 September 2012

#11m1 Friday 28/09/12

LO1 - To be able to use feedback to develop your idea
LO2 - To begin to collect resources that will 

Task 1 - Update Overviews (10 minutes)


  • Go on to your school email 
  • Use the feedback i have sent you to update your game overview (make any changes in a new colour)
  • Link up your updated game overview on the development page of your website


Task 2 - Genre vs Style (10 minutes)

  • Write a blog on your post explaining:
  • What is meant by by the genre of a video game?
  • What video game genres are there?
  • What is meant by the style of a video game?
  • What are the genre and style of your video game?

Task 3 - Collecting for Moodboard (25 minutes)

  • Use your checklist to begin collecting images for your moodboard - remember that at this stage they should only be ideas and inspirations NOT designs - nothing on the moodboard should be hand drawn
  • You should aim to collect at least 2/3 images for item on the checklist
  • Paste the images that you collect into a word document (add a header with your name in it) and save it in your Development folder

Plenary - What progress have you made today(5 minutes)

  • Update your moodboard checklist by writing today's date next to any items that you have finished collecting

Sunday, 23 September 2012

#11m1 Monday 24/09/12

LO1 - Understand the scenario for unit5
LO2 - Be able to develop an idea for a suitable game for unit5

Scenario

The year is 2552. It has been 540 years since the Olympic Games were held in London. The Games have changed out of all recognition since 2012. Not only do competitors come from all over the globe but from the far reaches of the Galaxy. Events for these Olympic Games will take place on land, sea, in the air and in outer space.

You should use your imagination to design an original game based on a sporting event for the 2552 Olympics.

Task 2 - Game Overview

You must come up with an idea for your game

Complete the game overview (it should be in your development folder)
  • Target audience. Who is the intended audience for your game? Which age group (up to 14 years)? Girls and/or boys? Why have you chosen this audience? What are their interests? How do you know?

  • Event. What event will you choose? Explain your choice. Remember that it must be a sporting event suitable for the Olympics. 
  • Purpose/objective. What is the objective of your game? What does the player have to do to complete the game? Do they need to take part in heats or win points? How will you make each level more difficult? Is there a time limit?
  • PEGI rating. What will the Pan European Game Information (PEGI) rating be? Give reasons for your decision.
  • Teacher feedback. Record teacher feedback on your game overview, and any action taken.
  • Teacher feedback on moodboard. You must complete this section after you have produced a moodboard.

  • Email me (m.smith@wildern.hants.sch.uk) a copy of your completed Game Overview
  • I will complete the feedback section and return it to you for next lesson

Plenary

  • Post on your blog with an explanation of your game idea.
  • Go to the blogs of at least 3 other people in the class and comment on their game idea post

Wednesday, 19 September 2012

#11m1 #11n3 Thursday 20/09/12

Task1 

Make sure that you have completed:
  • Making folders
  • Creating your website
  • Add a link to your website on to your blog
Click here to see the post for last lesson if you need help with this

Task 2

Download these documents and save them in your Development folder


Assets_table.doc Download this file

Game_overview.doc Download this file

Moodboard_list.doc Download this file

Rules_Log.doc Download this file

Test_plan.doc Download this file

Storyboards.doc Download this file


Task 3

Download this document into your Game folder


Game_review.doc Download this file


Task 4

  • Play some of last years London 2552 games. 
  • They are on the read drive (file store/Read/ICT/Mr Smith/London 2552 Games)
  • Whilst you are playing think about what makes a "good" game


Task 5

  • Add a new post to your blog
  • In your post write (minimum 50 words) about your thoughts from task 4 - what make a "good" game?

Tuesday, 18 September 2012

#11m1 #11n3 Wednesday 19/09/12

  • LO1 - Understand the SPB requirements for your unit5 folders and eportfolio
  • LO2 - Be able to create a suitable eportfolio for the Unit5 SPB

Starter

Folders needed for Unit5
  1. In Sites set up the folders that you will need for this year
  2. Make sure that you use exactly the names on the hierarchy chart on the right

Main

Eportfolio Structure

  1. Using Adobe Dreamweaver create the web pages that you will need for your eportfolio
  2. Make sure that you have the right information on each page
  3. Use your  Adobe Dreamweaver skills to customise the colours and fonts of your webpages


Plenary

  1. In Layout view of your blog add a Link List Gadget to your blog
  2. Add a link to your Unit5 eportfolio
  3. Post on your blog about what you have acheieved in today's lesson


Friday, 14 September 2012

#11m1 #10n1 Friday 14th September

Blog Challenge

Starter

  • Add your blog address to my blog names spreadsheet (click here for it). Make sure that you are on the sheet for your class!

Development

To make the most of you Blog, make sure that you have the following!
  1. A clear and suitable template
  2. Use the customise area to choose suitable colours, fonts and layout
  3. Add the list of our class' blogs to your reading list (on your dashboard)
  4. Use the 'Blog List' gadget to follow mrmjsmith.co.uk and the other people in your class (use your reading list)
  5. Use FaceYourmanga.com to create an avatar of your self
  6. Add your avatar as both your profile picture (in the dashboard) and as an image using the 'Picture' gadget
  7. Use this link to add your existing Twitter account feed to your Blog (you may have to use the html/java gadget)
  8. Change the Favicon of your site
  9. Add any other suitable gadgets to your site (www.bloggergadgets.net)
  10. Use Adobe Fireworks to create a suitable banner for your site (no more than 900 x 100 and save as .png with transparent background)

Extension:

  • In the same way that you access your Blog (school email > black bar), go to your own Wildern School YouTube account and set up your channel!
  • Add a suitable gadget to you Blog to show your channel off

Plenary

  • Post on your blog about what you have done in today's lesson
  • Use your reading list (from your dashboard) to look at some of your class mates blogs - is there anything you could do to improve your blog

Tuesday, 11 September 2012

Blog Addresses

Click on the link below and add the address for your blog to the list for your class

This will help me follow you and you to follow each other

Blog Address Spreadsheet